Somebody pinch me! My DIY Vintage Marquee sign was featured at House of Hepworths How exciting! I know people are featured there and many other places all the time, but this time it was ME and I'm sooo excited!! House of Hepworths is such an awesome blog, with linky parties, project inspiration and lots of thrify DIY! Please check them out, you won't be sorry! Thank you so much Allison for the shout out!

Thursday, May 10, 2012

Wednesday, May 9, 2012
Do You Facebook?
Do you facebook? I have to admit, I have a page and occasionally I check it out, honestly I use it mostly to see what my kids are doing! But I'm thinking I may have to check it out a little more. I just realized The Shabby Creek Cottage featured my DIY Vintage Marquee sign on their facebook page! Check it out and be sure to "like" The Shabby Creek Cottage and if you've never read their blog, well- it's a must read- I check it out every day- so much inspiration going on over there! Thanks so much for the feature Gina!
Tuesday, May 1, 2012
When Inspiration Hits!
It's hard to know just what will inspire me! We've been to TGIF'S hundreds of times (we like TGIF'S Ok!) and I've seen this sign, and ones like it, hundreds of times, but this time it hit me. I want that sign for the shelf that's going over the kitchen window (yes, I decorate things before they exist, doesn't everyone?)!
 So, after much thinking on exactly how to DIY a vintage lighted metal sign I came up with this:

 This is what I started with. Cardboard cutouts. I got mine from JoAnn Fabrics, but I've seen them lots of places. You will also need a good sharp utility knife. The first thing you want to do is carefully cut the top off of each letter using the knife. Slide the blade down between the top and side and go all the way around each letter. Be careful not the slice the sides. Take out anything that might be inside the letter- mine had some folded cardboard to re-enforce it.
 This is what the letters should look like when you're done- no top and hollow!
 Now that you have them all cut out, sand the edges so they are all nice and smooth, use scissors to snip off any large chunks that the knife may have left. Keep your knife and sanding block handy, you will need them again later!
 Now we are going to paint. I'm not going to show you every step of painting, I'll just show you the important paint and tell you the rest! First I spray painted them all black (inside and out), then I sprayed them Krylon Chrome (inside and out) I've used lots of different "metal" spray paints and I feel this one has the most shine. Now the tricky part- flip your letters over so you don't get any paint on the INSIDE of the letters. Spray ONLY the OUTSIDE of the letters in whatever color you want- I chose Rustoleums Leafy Green.
 Green paint on the outside, silver on the inside!
 Get your sanding block out again and gently sand off some of the green so that some of the silver shows. Now, it looks old and vintage-y!
 These are the lights I used. Got them at Target in the patio/outdoor lighting section- they were $9.99 awesome!
 Flip your letters over and mark off where you want each light bulb to be. I drew lines down the center and then layed the strand of lights on the letter and eyeballed where I wanted them, then marked the spot with a marker.
 You need your utility knife again for this next step. Make an X over the mark (ignore the double marks on mine, I decided I didn't like the orginal placement) Be sure this is where you want your light bulb before you cut, once you've cut there's no going back!
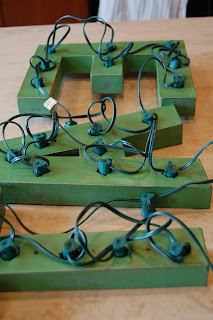 Unscrew the lightbulbs from the sockets and GENTLY push through the holes. Taking care not to rip the cardboard. Use the knife to make the slits bigger if you need to. This is what the back will look like when you are finished. It's a mess, but no one will see the back and you can take the wires down so they don't stick out too much!
 Screw your lightbulbs back in and plug it in! Now you have a cool vintage-y lighted "metal" marquee sign!
Savvy Southern Style The Well Crafted Home
Not JUST a Housewife Doodles & Stitches
Shabby Chic Cottage
36th Avenue
House of Hepworths
Crafty, Scrappy, Happy
Primp
Chic on a Shoestring
Simple Home. Life
Lolly Jane
Freckled Laundry
Whipperberry
Be Different Act Normal
Funky Junk
Classy Clutter
Under the Table and Dreaming
DIY Showoff
AKA Design
Uncommon

Whatcha think? OK so it's not vintage (but it's vintage-y!) and it's not metal (but it looks like metal!)! Want to know how I did it?
 This is what I started with. Cardboard cutouts. I got mine from JoAnn Fabrics, but I've seen them lots of places. You will also need a good sharp utility knife. The first thing you want to do is carefully cut the top off of each letter using the knife. Slide the blade down between the top and side and go all the way around each letter. Be careful not the slice the sides. Take out anything that might be inside the letter- mine had some folded cardboard to re-enforce it.
 This is what the letters should look like when you're done- no top and hollow!
 Now that you have them all cut out, sand the edges so they are all nice and smooth, use scissors to snip off any large chunks that the knife may have left. Keep your knife and sanding block handy, you will need them again later!
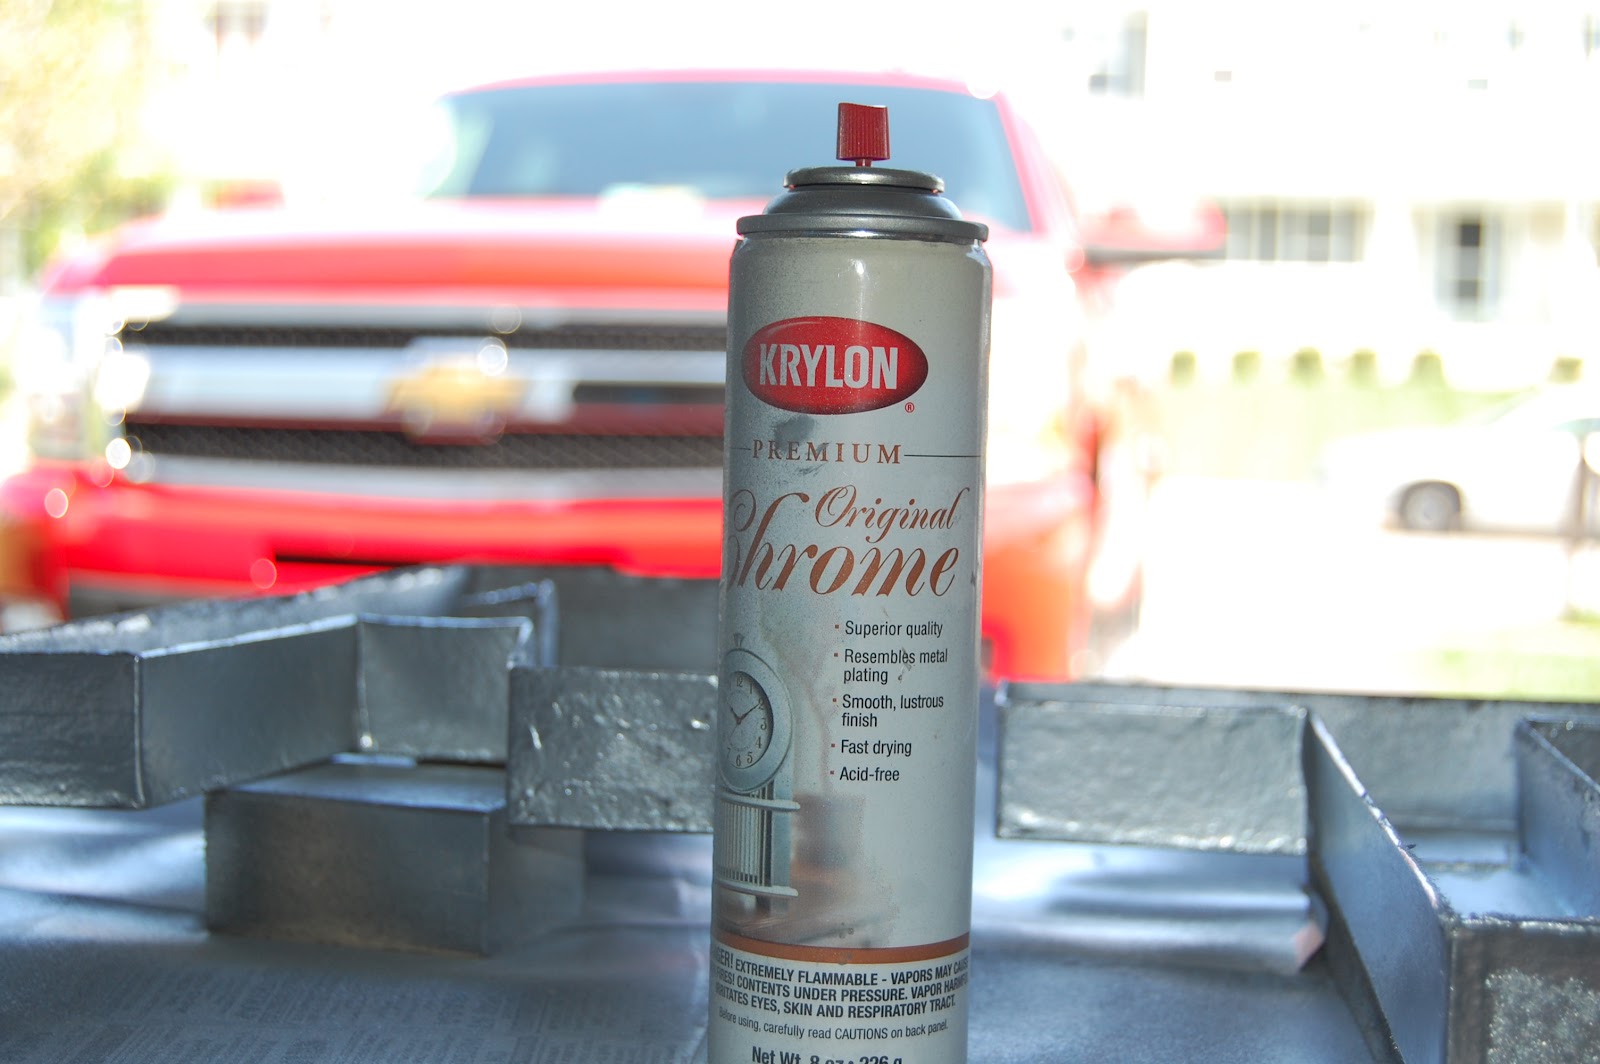 Now we are going to paint. I'm not going to show you every step of painting, I'll just show you the important paint and tell you the rest! First I spray painted them all black (inside and out), then I sprayed them Krylon Chrome (inside and out) I've used lots of different "metal" spray paints and I feel this one has the most shine. Now the tricky part- flip your letters over so you don't get any paint on the INSIDE of the letters. Spray ONLY the OUTSIDE of the letters in whatever color you want- I chose Rustoleums Leafy Green.
 Green paint on the outside, silver on the inside!
 These are the lights I used. Got them at Target in the patio/outdoor lighting section- they were $9.99 awesome!
 Flip your letters over and mark off where you want each light bulb to be. I drew lines down the center and then layed the strand of lights on the letter and eyeballed where I wanted them, then marked the spot with a marker.
 You need your utility knife again for this next step. Make an X over the mark (ignore the double marks on mine, I decided I didn't like the orginal placement) Be sure this is where you want your light bulb before you cut, once you've cut there's no going back!
 Unscrew the lightbulbs from the sockets and GENTLY push through the holes. Taking care not to rip the cardboard. Use the knife to make the slits bigger if you need to. This is what the back will look like when you are finished. It's a mess, but no one will see the back and you can take the wires down so they don't stick out too much!
 Screw your lightbulbs back in and plug it in! Now you have a cool vintage-y lighted "metal" marquee sign!
Linking to:
Not JUST a Housewife Doodles & Stitches
Shabby Chic Cottage
36th Avenue
House of Hepworths
Crafty, Scrappy, Happy
Primp
Chic on a Shoestring
Simple Home. Life
Lolly Jane
Freckled Laundry
Whipperberry
Be Different Act Normal
Funky Junk
Classy Clutter
Under the Table and Dreaming
DIY Showoff
AKA Design
Uncommon
Tuesday, April 24, 2012
Sham-A-Lam-A-Ding-Dong!!
Somebody pinch me! My "no sew" bech seat cover was featured at Knock Off Decor! Un-stinkin'-believable! Head your sweet little self over to Knock Off Decor for some of the most inspirational projects on the face of the Earth! Thank you soooo much Beckie!!
Tuesday, April 17, 2012
The Story of a Bench
This is a story of a bench. A bench that is really old, nobody knows for sure just how old, but it's been in the family as long as anyone still alive can remember. For some reason my husband loves it. Maybe because it's the only thing that was permanent in his life as a child (deep I know!) I'm not here to psycho analyze my husband (although, believe me I've tried!) This bench has been a part of our lives for about 20 years. I've never thought much about it, it was just a bench. It's made all 5 moves with us unscathed. I've recovered the cushion on it a couple times to match the ever changing decor. But this time is the last. Why? Because it's now perfect. It's more than a bench you see. Now it's dare I say it..... a work of art! Ok, maybe that's an exageration, but I absolutely love it! I saw this picture in my House Beautiful magazine and inspiration hit me!
It's from Hillsdale General Store I've never heard of them before, and for good reason! This bench costs $895! What?!?! I recovered my cushion for less than $25! All I did was weave upholstery jute webbing and glue it to the underside of the foam! Love it!!
 Im sure you're saying, but yours doesn't have the cool metal and boot tray underneath. And my answer is "no, but mine has history"! And it's no longer just the bench that's been in my husbands family forever, now I love it just as much as he does!
Here is a quick idea of how I did it- it was just soooo easy!

First this is what you are going to need:
It's called jute webbing, you can find it at any fabric store in the upholstery area, it comes on a big spool and you buy it by the yard. Mine only cost .79 (that's cents people!) a yard! For my bench I bought 22 yards. The cushion is 3 inches thick and it's about 3 ft long and just less than 2 ft wide.
 Can you see the little flap? That's where I glued it together, it's in the back, so no one sees it!
 Now you are going to measure the top of the cushion, from left to right over the edge and about 3 or 4 inches under. (I glued my jute to the underside of the cushion rather than going all the way around)
Now that you have all your pieces cut it's time to start weaving! The easiest way it to lay your long pieces on the top of the cushion and weave them over or under the piece you have glued around the edge. Once they are all weaved under or over the edge, glue those pieces to the underside of the cushion. Then start with the short pieces. Weave them in and out of the long pieces across the top of the cushion. Don't glue them until you have them all weaved so you can adjust the spacing as needed. Once it's all weaved and spaced just right glue the ends to the underside of the cushion!
Now you are going to measure the top of the cushion, from left to right over the edge and about 3 or 4 inches under. (I glued my jute to the underside of the cushion rather than going all the way around)
Now that you have all your pieces cut it's time to start weaving! The easiest way it to lay your long pieces on the top of the cushion and weave them over or under the piece you have glued around the edge. Once they are all weaved under or over the edge, glue those pieces to the underside of the cushion. Then start with the short pieces. Weave them in and out of the long pieces across the top of the cushion. Don't glue them until you have them all weaved so you can adjust the spacing as needed. Once it's all weaved and spaced just right glue the ends to the underside of the cushion!

Here's a close up of the top weaving
Closer picture of the weaving and our other family heirloom, the quilt my great-grandmother made.

I made this pillow for said bench after the original photo was taken, just thought I'd show you that too!
Linking to:
Shabby Creek Cottage
Somewhat Simple
House of Hepworths
Crafty Scrappy Happy
The 36th Avenue
 |
| sorry horrible picture |
 Im sure you're saying, but yours doesn't have the cool metal and boot tray underneath. And my answer is "no, but mine has history"! And it's no longer just the bench that's been in my husbands family forever, now I love it just as much as he does!
Here is a quick idea of how I did it- it was just soooo easy!

First this is what you are going to need:
It's called jute webbing, you can find it at any fabric store in the upholstery area, it comes on a big spool and you buy it by the yard. Mine only cost .79 (that's cents people!) a yard! For my bench I bought 22 yards. The cushion is 3 inches thick and it's about 3 ft long and just less than 2 ft wide.
Next: you will measure all the way around the outside edge of the cushion. Cut a piece of jute about 5inches longer than the distance around. Fold one end over and glue it to itself to make a nic clean end. Then wrap that piece around the cushion, pull it tight and glue it together (using a hot glue gun).
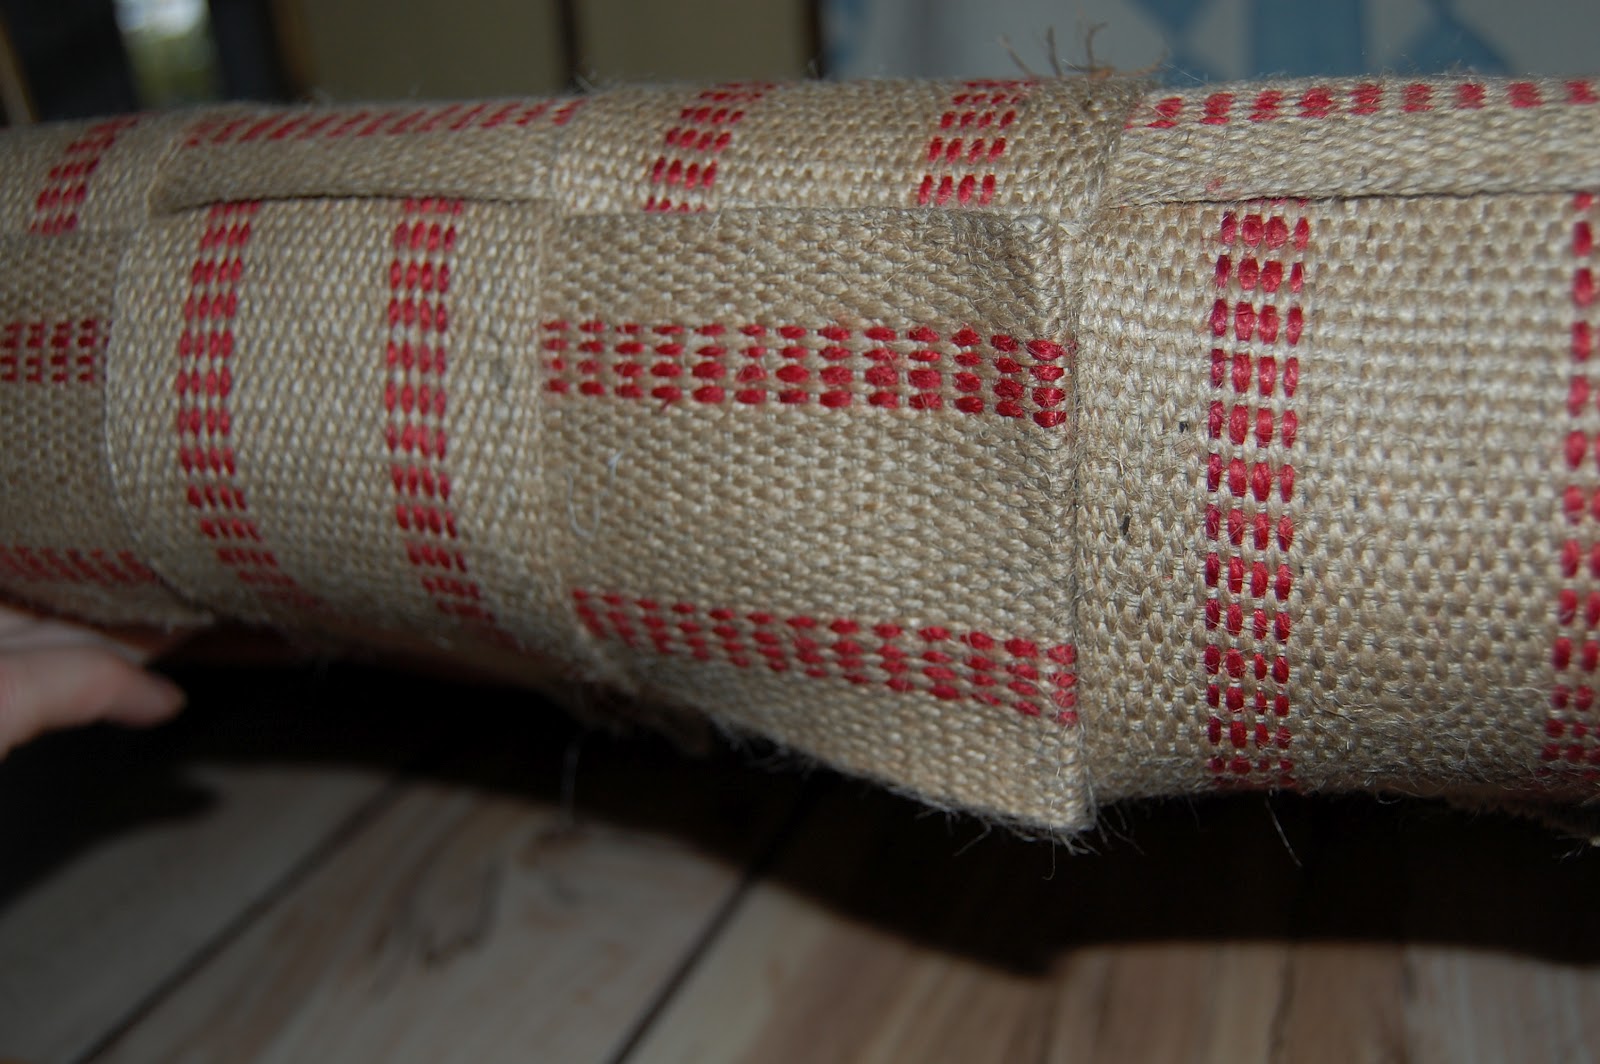 Can you see the little flap? That's where I glued it together, it's in the back, so no one sees it!
 Now you are going to measure the top of the cushion, from left to right over the edge and about 3 or 4 inches under. (I glued my jute to the underside of the cushion rather than going all the way around)
Cut enough pieces of jute to go across the top (over the edge and underneath) mine took 7 pieces. Now measure from front to back, again over the edge and 3 or 4 inches underneath. Cut enough pieces to cover the top.

Here's a close up of the top weaving
 |

I made this pillow for said bench after the original photo was taken, just thought I'd show you that too!
Linking to:
Shabby Creek Cottage
Somewhat Simple
House of Hepworths
Crafty Scrappy Happy
The 36th Avenue
Monday, April 16, 2012
Eeek! Featured!!
Hey! Lindsey at Better After featured my chair reupholster! Im soooo excited! Please check out her blog for more amazing Before and Afters and her hilarious quips!
Thanks Lindsey!
Thanks Lindsey!
Friday, April 13, 2012
Baseball Jersey Floor Pouf
Being the mother of 3 boys has provided me with an over abundance of sports jerseys and t-shirts. Since I am constantly thinking of ways to recycle rather than add to the dump. I decided to make a floor pouffy (is that a real word?!?) for the "sports room" aka place where the boys gather in the basement to play foos ball or X Box and generally make a big mess. This one was made with Baseball shirts from my now non-playing 17 yr old.


It's great for the boys to sit or lay on while playing X Box! Now what did I do with all those football jerseys......
Linking To:
Simple Home Life
House of Hepworths
Somewhat Simple
Freckled Laundry
Addicted 2 Decorating
AKA Design
Be Different Act Normal

Front/Top

Back/Bottom
I made my own pattern, centered it on the front to cover as much of the team name as possible, then on the back to get his name and number (#5 is obviously his favorite number!), cut out the pieces, sewed them together, and stuffed it with bean bag beans.
It's great for the boys to sit or lay on while playing X Box! Now what did I do with all those football jerseys......
Linking To:
Simple Home Life
House of Hepworths
Somewhat Simple
Freckled Laundry
Addicted 2 Decorating
AKA Design
Be Different Act Normal
Subscribe to:
Posts (Atom)