Saturday, May 26, 2012

Where Our Hearts Never Leave

Thanks so much for all the lovely comments on my gallery wall! As promised here is the tutorial for the "Home" wall art. It's really very simple.

You will need a piece of plywood (not MDF, you need to see the grain), sticker letters (I used 2 different sized fonts) stain, rubber gloves, clean cloth, white spray paint, sandpaper (I used a palm sander, 'cause I'm lazy)

1. Cut your wood, mine is about 8X10
2. Stain your wood. Use the rubber gloves and a clean cloth, get it good and covered, nice and dark.
3. Let it dry completely- this is very hard for me, I'm extremely impatient!
4. Lay out your sticker letters. Obviously you can use any quote you like, but I used:

"Where we love is HOME, HOME that our feet may leave but not our HEARTS"
Be sure the letters are stuck down nice and tight, you don't want any of the spray paint leaking under!

5. Spray white spray paint in light even coats over the entire surface. Spray from the top, not sideways to lessen the chance of paint getting under the sticker letters.

6. Carefully peel off the sticker letters. As soon as you are done spraying. Don't wait and do a second coat, just spray one good coat and peel the letters off immediately or they will stick forever! I used a pin to pull up one corner so as not to smudge the paint.
7. Let it dry completely! After it's completely dry, rough it up with sandpaper around the edges and in a few meaningful places.
8. Attach a hanger on the back and hang up your really cool wall art!


Linking to:

House of Hepworths; http://www.houseofhepworths.com/
Chic on a Shoestring: http://chiconashoestringdecorating.blogspot.com/
Fingerprints on the Fridge: http://www.fingerprintsonthefridge.com/
Whipperberry: http://whipperberry.com/
Simple Home. Life: http://www.mysimplehomelife.com/
Remodelaholic: http://www.remodelaholic.com/
Finding Fabulous: http://www.findingfabulousblog.com/
Freckled Laundry: http://www.freckledlaundry.com/
Tattertots & Jello:  http://tatertotsandjello.com/
Doodles&Stitches http://www.doodlesandstitches.com/


Monday, May 21, 2012

A Wall with a Purpose

I had this blank wall at the top of my stairs that was begging for something. Then I saw this gallery wall and I was inspired!
This wall is right at the top of the stairs. To the right is one boys room straight ahead is the master bedroom. To the left and behind are the rest of the bedrooms, laundry room and bathroom.
I wanted this wall to depict home. And my home IS my boys. The photos were taken when they were itty bitty (they are now 20,17, and 11)

Awww weren't they sweet?!


This is how I hang ALL my pictures, whether they are in a gallery formation or singularly. It's soooo much easier and I get the nail in the right place every time. Here's what you do:
1. trace your picture on newspaper and cut out
2. punch a hole in the newspaper where the nail should go.
3. use painters tape to arrange your "pictures" on the wall. This way you can move them around as much as you like and get them exactly where you want them!
4. hammer a nail right through the newspaper where you marked it!

See the nail right through the newspaper? Guaranteed to be exactly right!


Here are a few of the things other than photos on the wall. I'm sure you've all seen this You Are My Sunshine wall art by A.K.A Design. I fell in love with it immediately! She has an awesome tutorial on how to make one of your own. The only differences between hers and mine are colors obviously, mine is much smaller, and I rubbed stain all over mine, whereas she used an ink pad.
I have been wanting to use this quote somewhere for quite awhile! I just love it! It's kind of hard to tell in these photos, but the words are wood grain. I will have a tutorial for this up by next Monday, so come on back!
"Owl always love you" This was a super easy little picture. I just cut burlap to fit an old frame, stamped some cute little owls on it then used some sticker letters from my scrap booking stash.


I'd love to say I made this, but alas I do not have the program on my computer to make all the cool subway art that everyone is making! I do have an idea for something like this tho, stay tuned!
Now that wall at the top of the stairs has a purpose. All is happy!


Linking to :
 Not Just a Housewife http://www.notjustahousewife.net/
The Well Crafted Home:  http://thewellcraftedhome.blogspot.com/
Somewhat Simple:  http://www.somewhatsimple.com/
Crafty Scrappy Happy: http://www.craftyscrappyhappy.net/
 Under The Table & Dreaming: http://www.bystephanielynn.com/

Saved By Love/Thrifty Thursdays: http://savedbylovecreations.com/
Tuesday, May 15, 2012

Featured at Uncommon!

Another feature for the DIY Marquee Sign! Unbelieveable! Please please please check out Uncommon. They have so much going on over there, inspiration, linky parties, giveaways- it's nuts!  Thank you Bonnie & Trish!

Fluffing, Primping&Re-Arranging

I finally got all the Easter/Spring decorations put away this weekend and changed some things up! I don't really have anything specific for summer, so I just kind of pull stuff from around the house to make little vignettes.

 My mantle is still a little "springy", but it will morph a bit as the 4th of July comes


We've been collecting hardcover books from The Salvation Army lately. The small brown one above is a book of poems by Longfellow circa 1883. I was pretty excited when I stumbled on that in the big bin of books!


In the corner next to the mantle I have this little farm table. Under it is an old crate with a couple pillows I made and a "frenchy" towel.


My plants are in an old bushel basket and a new bucket. I whitewashed the outside of the bucket to give it a little age. I would like to say putting these labels from the Graphics Fairy was totally my idea, but it was the brain child of Janet from the Decorating Diaries If you would like to how we did it please jump over to the Decorating Diaries, she has a quick and easy tutorial.


Lastly, the dining room table is still a work in progress. I have my apothecary jars filled with misc. neutral items. One has some of my grandmas buttons, another some shredded book pages and the largest one has some DIY typography spheres.

Basically those are just ping pong balls with either sticker or rub-on letters, numbers and punctuation. I would recommend using rub-ons if you make some of those, the stickers are not staying on very well!
I've been working on a gallery wall, that will hopefully (fingers crossed) be complete by this time next week! See you then!


Linking to:


 Not Just a Housewife http://www.notjustahousewife.net/
The Well Crafted Home:  http://thewellcraftedhome.blogspot.com/
 Somewhat Simple:  http://www.somewhatsimple.com/
 The 36th Avenue: http://www.the36thavenue.com/
 Crafty Scrappy Happy: http://www.craftyscrappyhappy.net/
 Saved By Love/Thrifty Thursdays: http://savedbylovecreations.com/
House of Hepworths; http://www.houseofhepworths.com/
 Fingerprints on the Fridge: http://www.fingerprintsonthefridge.com/
Tattertots & Jello:  http://tatertotsandjello.com/
DIY Showoff: http://diyshowoff.com/
Be Different Act Normal: http://www.bedifferentactnormal.com/ 

Thursday, May 10, 2012

Pinch Me!

Somebody pinch me! My DIY Vintage Marquee sign was featured at House of Hepworths How exciting! I know people are featured there and many other places all the time, but this time it was ME and I'm sooo excited!!  House of Hepworths is such an awesome blog, with linky parties, project inspiration and lots of thrify DIY! Please check them out, you won't be sorry! Thank you so much Allison for the shout out!

Wednesday, May 9, 2012

Do You Facebook?

Do you facebook? I have to admit, I have a page and occasionally I check it out, honestly I use it mostly to see what my kids are doing! But I'm thinking I may have to check it out a little more. I just realized The Shabby Creek Cottage featured my DIY Vintage Marquee sign on their facebook page! Check it out and be sure to "like" The Shabby Creek Cottage and if you've never read their blog, well- it's a must read- I check it out every day- so much inspiration going on over there! Thanks so much for the feature Gina!

Tuesday, May 1, 2012

When Inspiration Hits!

It's hard to know just what will inspire me! We've been to TGIF'S hundreds of times (we like TGIF'S Ok!) and I've seen this sign, and ones like it, hundreds of times, but this time it hit me. I want that sign for the shelf that's going over the kitchen window (yes, I decorate things before they exist, doesn't everyone?)!
So, after much thinking on exactly how to DIY a vintage lighted metal sign I came up with this:

Whatcha think? OK so it's not vintage (but it's vintage-y!) and it's not metal (but it looks like metal!)! Want to know how I did it?

This is what I started with. Cardboard cutouts. I got mine from JoAnn Fabrics, but I've seen them lots of places. You will also need a good sharp utility knife. The first thing you want to do is carefully cut the top off of each letter using the knife. Slide the blade down between the top and side and go all the way around each letter. Be careful not the slice the sides. Take out anything that might be inside the letter- mine had some folded cardboard to re-enforce it.
This is what the letters should look like when you're done- no top and hollow!

Now that you have them all cut out, sand the edges so they are all nice and smooth, use scissors to snip off any large chunks that the knife may have left. Keep your knife and sanding block handy, you will need them again later!
Now we are going to paint. I'm not going to show you every step of painting, I'll just show you the important paint and tell you the rest! First I spray painted them all black (inside and out), then I sprayed them Krylon Chrome (inside and out) I've used lots of different "metal" spray paints and I feel this one has the most shine. Now the tricky part- flip your letters over so you don't get any paint on the INSIDE of the letters. Spray ONLY the OUTSIDE of the letters in whatever color you want- I chose Rustoleums Leafy Green.
Green paint on the outside, silver on the inside!
Get your sanding block out again and gently sand off some of the green so that some of the silver shows. Now, it looks old and vintage-y!
These are the lights I used. Got them at Target in the patio/outdoor lighting section- they were $9.99 awesome!
Flip your letters over and mark off where you want each light bulb to be. I drew lines down the center and then layed the strand of lights on the letter and eyeballed where I wanted them, then marked the spot with a marker.
You need your utility knife again for this next step. Make an X over the mark (ignore the double marks on mine, I decided I didn't like the orginal placement) Be sure this is where you want your light bulb before you cut, once you've cut there's no going back!
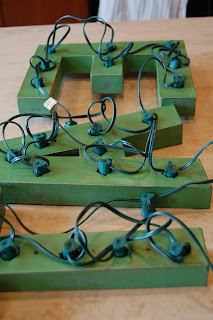
Unscrew the lightbulbs from the sockets and GENTLY push  through the holes. Taking care not to rip the cardboard. Use the knife to make the slits bigger if you need to. This is what the back will look like when you are finished. It's a mess, but no one will see the back and you can take the wires down so they don't stick out too much!
Screw your lightbulbs back in and plug it in! Now you have a cool vintage-y lighted "metal" marquee sign!

Linking to:

Savvy Southern Style                  The Well Crafted Home                  
Not JUST a Housewife                Doodles & Stitches
Shabby Chic Cottage
36th Avenue
House of Hepworths
Crafty, Scrappy, Happy
Primp
Chic on a Shoestring
Simple Home. Life
Lolly Jane
Freckled Laundry
Whipperberry
Be Different Act Normal
Funky Junk
Classy Clutter
Under the Table and Dreaming
DIY Showoff
AKA Design
Uncommon