
It's hard to know just what will inspire me! We've been to TGIF'S hundreds of times (we like TGIF'S Ok!) and I've seen this sign, and ones like it, hundreds of times, but this time it hit me. I want that sign for the shelf that's going over the kitchen window (yes, I decorate things before they exist, doesn't everyone?)!
 So, after much thinking on exactly how to DIY a vintage lighted metal sign I came up with this:

 This is what I started with. Cardboard cutouts. I got mine from JoAnn Fabrics, but I've seen them lots of places. You will also need a good sharp utility knife. The first thing you want to do is carefully cut the top off of each letter using the knife. Slide the blade down between the top and side and go all the way around each letter. Be careful not the slice the sides. Take out anything that might be inside the letter- mine had some folded cardboard to re-enforce it.
 This is what the letters should look like when you're done- no top and hollow!
 Now that you have them all cut out, sand the edges so they are all nice and smooth, use scissors to snip off any large chunks that the knife may have left. Keep your knife and sanding block handy, you will need them again later!
 Now we are going to paint. I'm not going to show you every step of painting, I'll just show you the important paint and tell you the rest! First I spray painted them all black (inside and out), then I sprayed them Krylon Chrome (inside and out) I've used lots of different "metal" spray paints and I feel this one has the most shine. Now the tricky part- flip your letters over so you don't get any paint on the INSIDE of the letters. Spray ONLY the OUTSIDE of the letters in whatever color you want- I chose Rustoleums Leafy Green.
 Green paint on the outside, silver on the inside!
 Get your sanding block out again and gently sand off some of the green so that some of the silver shows. Now, it looks old and vintage-y!
 These are the lights I used. Got them at Target in the patio/outdoor lighting section- they were $9.99 awesome!
 Flip your letters over and mark off where you want each light bulb to be. I drew lines down the center and then layed the strand of lights on the letter and eyeballed where I wanted them, then marked the spot with a marker.
 You need your utility knife again for this next step. Make an X over the mark (ignore the double marks on mine, I decided I didn't like the orginal placement) Be sure this is where you want your light bulb before you cut, once you've cut there's no going back!
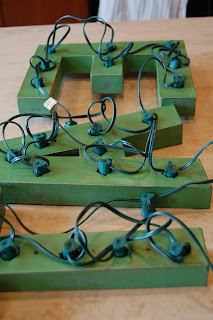 Unscrew the lightbulbs from the sockets and GENTLY push through the holes. Taking care not to rip the cardboard. Use the knife to make the slits bigger if you need to. This is what the back will look like when you are finished. It's a mess, but no one will see the back and you can take the wires down so they don't stick out too much!
 Screw your lightbulbs back in and plug it in! Now you have a cool vintage-y lighted "metal" marquee sign!
Savvy Southern Style The Well Crafted Home
Not JUST a Housewife Doodles & Stitches
Shabby Chic Cottage
36th Avenue
House of Hepworths
Crafty, Scrappy, Happy
Primp
Chic on a Shoestring
Simple Home. Life
Lolly Jane
Freckled Laundry
Whipperberry
Be Different Act Normal
Funky Junk
Classy Clutter
Under the Table and Dreaming
DIY Showoff
AKA Design
Uncommon

Whatcha think? OK so it's not vintage (but it's vintage-y!) and it's not metal (but it looks like metal!)! Want to know how I did it?
 This is what I started with. Cardboard cutouts. I got mine from JoAnn Fabrics, but I've seen them lots of places. You will also need a good sharp utility knife. The first thing you want to do is carefully cut the top off of each letter using the knife. Slide the blade down between the top and side and go all the way around each letter. Be careful not the slice the sides. Take out anything that might be inside the letter- mine had some folded cardboard to re-enforce it.
 This is what the letters should look like when you're done- no top and hollow!
 Now that you have them all cut out, sand the edges so they are all nice and smooth, use scissors to snip off any large chunks that the knife may have left. Keep your knife and sanding block handy, you will need them again later!
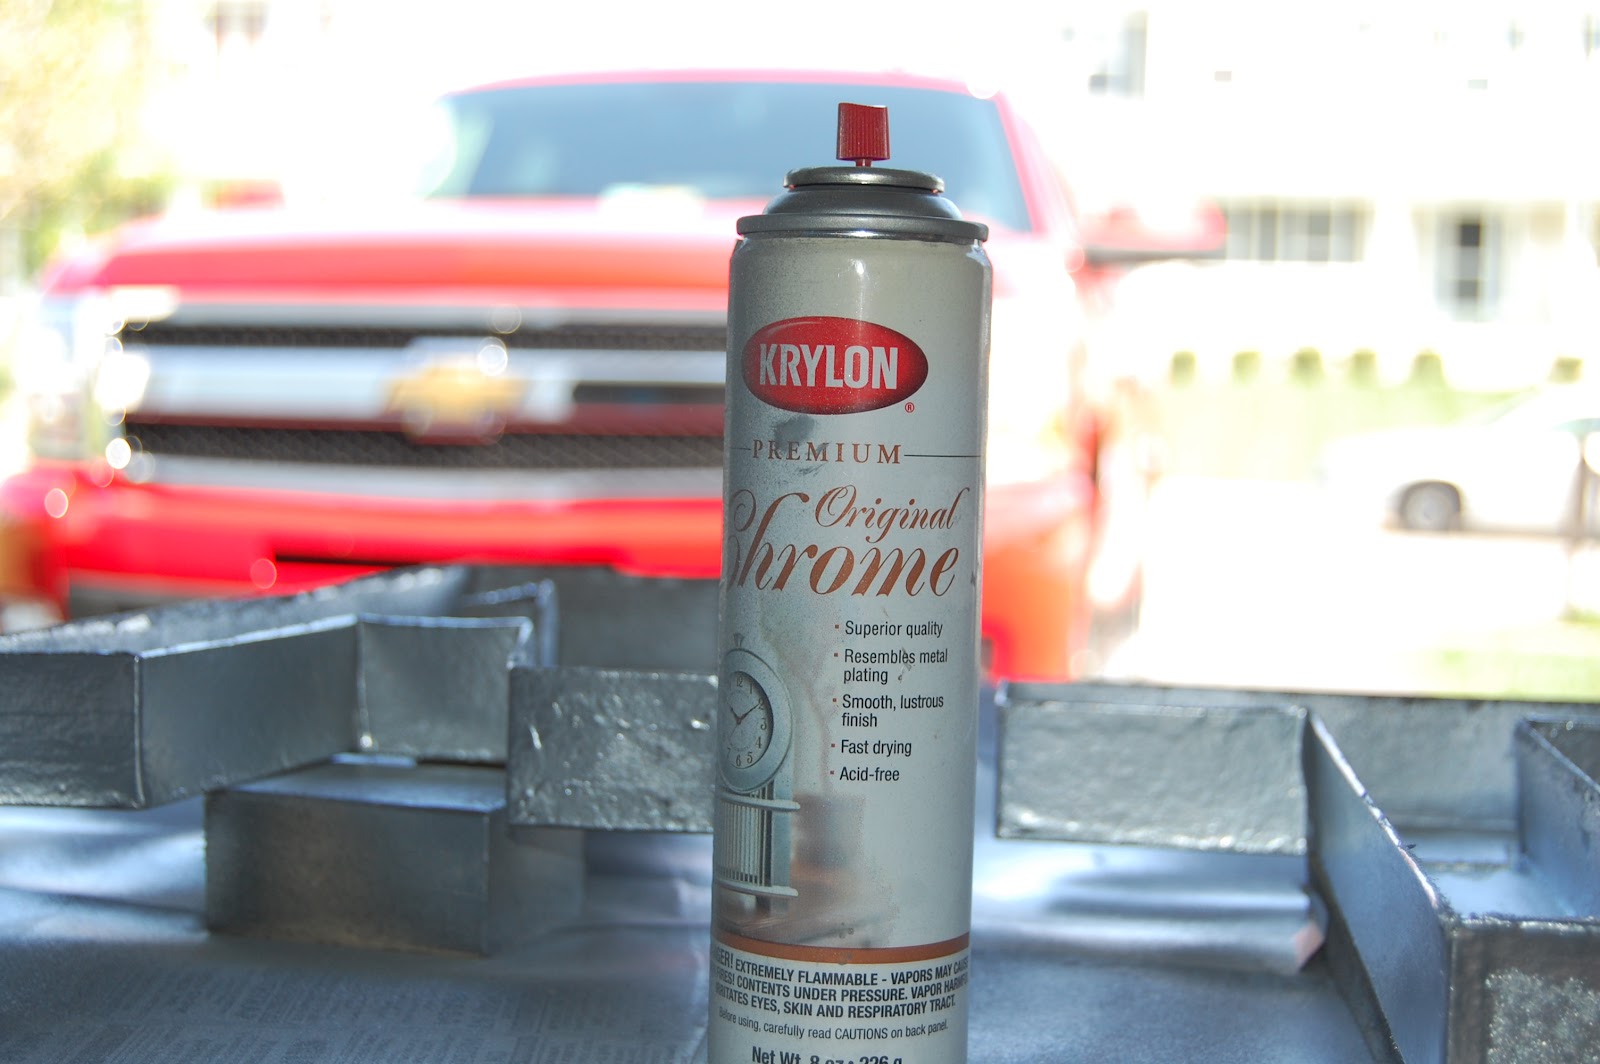 Now we are going to paint. I'm not going to show you every step of painting, I'll just show you the important paint and tell you the rest! First I spray painted them all black (inside and out), then I sprayed them Krylon Chrome (inside and out) I've used lots of different "metal" spray paints and I feel this one has the most shine. Now the tricky part- flip your letters over so you don't get any paint on the INSIDE of the letters. Spray ONLY the OUTSIDE of the letters in whatever color you want- I chose Rustoleums Leafy Green.
 Green paint on the outside, silver on the inside!
 These are the lights I used. Got them at Target in the patio/outdoor lighting section- they were $9.99 awesome!
 Flip your letters over and mark off where you want each light bulb to be. I drew lines down the center and then layed the strand of lights on the letter and eyeballed where I wanted them, then marked the spot with a marker.
 You need your utility knife again for this next step. Make an X over the mark (ignore the double marks on mine, I decided I didn't like the orginal placement) Be sure this is where you want your light bulb before you cut, once you've cut there's no going back!
 Unscrew the lightbulbs from the sockets and GENTLY push through the holes. Taking care not to rip the cardboard. Use the knife to make the slits bigger if you need to. This is what the back will look like when you are finished. It's a mess, but no one will see the back and you can take the wires down so they don't stick out too much!
 Screw your lightbulbs back in and plug it in! Now you have a cool vintage-y lighted "metal" marquee sign!
Linking to:
Not JUST a Housewife Doodles & Stitches
Shabby Chic Cottage
36th Avenue
House of Hepworths
Crafty, Scrappy, Happy
Primp
Chic on a Shoestring
Simple Home. Life
Lolly Jane
Freckled Laundry
Whipperberry
Be Different Act Normal
Funky Junk
Classy Clutter
Under the Table and Dreaming
DIY Showoff
AKA Design
Uncommon
Seriously...super cute!! my son would love something like this in his room!!! You are super clever! :)
ReplyDeleteBonnie @ uncommon
So CREATIVE!! I really love this idea and concept! I am so inspired to do something like this for my son's room!
ReplyDeleteVisiting from Link party:))
Very, very, very, cute!!! Thanks for all the great instructions. I would love to make one of these soon. I saw your post over at Funky Junk Interiors.
ReplyDeleteSo cool! I have been wanting to do something like this but covered in nickels or pennies.
ReplyDeleteSarah
Cable Car Couture
How awesome! Great job!
ReplyDeleteThat is awesome and such a creative and inexpensive solution! Great job!
ReplyDeleteLove this super cool!
ReplyDeleteThat is soo cool!! And such a great idea! Gina from Shabby Creek Cottage shared this on FB.
ReplyDeleteHave a great day! =)
~ Catie
This is so cute and creative! I would love for you to link this up at Well Crafted Wednesdays! You can find it here:
ReplyDeletehttp://thewellcraftedhome.blogspot.com/2012/05/well-crafted-wednesdays-link-party-3.html
LOVE! I have been trying to figure out how to do this exact project for my daughters new room!!!
ReplyDeleteSo cute I can't take it!! That would have caught my eye too at TGIF's. I might try it! So little time...so many things to try. I have clear lights I never use like those...hmmm...you really have inspired me. I'm posting this on my FB page! :)
ReplyDelete~ Julie
redheadcandecorate.com
this is amazing i love it what a fab idea xxxx
ReplyDeleteThis is fantastic, I love it. Great way to get that lighted retro sign look without having to find a lighted retro sign!
ReplyDelete~Bliss~
this is adorable! I have been looking for something as a "main" piece in my bedroom and I love stuff that gives off soft lighting.. this is perfect! Now find that right word...thanks for the inspiration.. :)
ReplyDeleteCarrie
Are you kidding me?? This is FANTASTIC! This idea was pure genius!!
ReplyDeleteHeidi@HomemadeBeautiesByHeidi
This is the coolest idea EVER! I cannot wait to do this. I found your link on House of Hepworth's link party. I would love for you to post this on my link party at... http://www.doodlesandstitches.com/2012/05/link-party-time.html
ReplyDeleteThanks for sharing!
Super cool! Thanks for linking up at my party :)
DeleteAmazing! totally amazing.
ReplyDeleteI am CRAZY about these!! So very clever how you made them! Excited to follow!
ReplyDeleteI saw this at Uncommon Designs, and I have to say I'm mightily impressed. I bow down to your awesome craftiness. Such a creative idea. Can't wait to see what you do next.
ReplyDeleteCongratulations! You are being featured tomorrow on http://www.doodlesandstitches.com/. You're welcome to grab a "featured button" and add it to your blog! Thank you for posting this awesome lettering. I love it.
ReplyDeleteCame over from Knock Off Decor. Your sign is amazing! Wish I had that talent!
ReplyDelete- Angela Marie @ http://sunkissedivory.blogspot.com
These are precious, but I have 2 questions:
ReplyDelete1. How did you hang these?
2. Is it safe to have a lightbulb touching cardboard for an extended amount of time?
I absolutely love these, but wanted to double check!
These are great!! Found you on Knock Off Decor.
ReplyDeleteSaw this on Knock Off Decor and had to come over! I love it!!! :)
ReplyDeletethank You. Your directions were written well. I am inspired.
ReplyDeleteAmber
ReplyDelete1. I dont hang mine- they sit on a shelf above my kitchen window
2. I left mine on for a long time- the light bulbs I used did not get hot to the touch.
Hope this helps!
Wow that was unusual. I just wrote an incredibly long comment but after I clicked submit my
ReplyDeletecomment didn't appear. Grrrr... well I'm not writing all
that over again. Anyway, just wanted to say superb blog!
Feel free to visit my weblog - ventanas
Does your website have a contact page? I'm having problems locating it but, I'd like to shoot you an email.
ReplyDeleteI've got some creative ideas for your blog you might be interested in hearing. Either way, great site and I look forward to seeing it develop over time.
Here is my web site: musicos
Angled corner cabinets can provide a flexible form of storage,
ReplyDeleteand managing spaces carefully lets you move around the kitchen and the more country style wicker basket drawers
for the traditional and cottage style kitchen. These
are a few ticket broker training tips that can help.
It's a good idea to sort through all of your beautiful produce can quickly over-ripen, wilt, or rot if not properly stored. When storing spices and condiments, you could use just about anything to organize your cabinets. Where do you start with this whole ticket broker training project?
My web-site; taylor swift concert tickets dallas 2013